Difference between revisions of "CISC181 S2017 Lab9"
From class_wiki
(→Instructions) |
(→Instructions) |
||
| (8 intermediate revisions by the same user not shown) | |||
| Line 1: | Line 1: | ||
===Preliminaries=== | ===Preliminaries=== | ||
| − | * Make a new '''Android''' project with ''n'' = 9 following [[CISC181_S2017_NewAndroidStudioProject | these ]] instructions through step 6. On step 7 "Select form factor...", switch over to step | + | * Make a new '''Android''' project with ''n'' = 9 following [[CISC181_S2017_NewAndroidStudioProject | these ]] instructions through step 6. On step 7 "Select form factor...", switch over to step 4 on the Android developers page tutorial [https://developer.android.com/training/basics/firstapp/creating-project.html here] and complete through step 6 which ends with "...click '''Finish'''". Make the activity be called "MyActivity". |
===Instructions=== | ===Instructions=== | ||
| − | First, make the | + | First, make the empty activity project as described above and confirm that you can build and run it -- either on the emulator or an actual Android device as explained on the next page [https://developer.android.com/training/basics/firstapp/running-app.html "Run Your App"]. |
| − | Second, take the | + | Second, take the empty activity project and modify it to become a very simple "rock paper scissors" generator as detailed below: |
# Change the layout in <tt>activity_my.xml</tt> to a vertical <tt>LinearLayout</tt>, similar to [http://developer.android.com/guide/topics/ui/layout/linear.html this example] | # Change the layout in <tt>activity_my.xml</tt> to a vertical <tt>LinearLayout</tt>, similar to [http://developer.android.com/guide/topics/ui/layout/linear.html this example] | ||
| Line 13: | Line 13: | ||
# Add an <tt>ImageView</tt> underneath, centered laterally, that initially shows a rock, paper, OR scissors image. Find your own for these, cropped and scaled to 250 x 250, and put them in <tt>res/drawable</tt> with the names "rock.png", "paper.png", and "scissors.png". Here's some help for [http://developer.android.com/guide/topics/resources/drawable-resource.html drawable resources] | # Add an <tt>ImageView</tt> underneath, centered laterally, that initially shows a rock, paper, OR scissors image. Find your own for these, cropped and scaled to 250 x 250, and put them in <tt>res/drawable</tt> with the names "rock.png", "paper.png", and "scissors.png". Here's some help for [http://developer.android.com/guide/topics/resources/drawable-resource.html drawable resources] | ||
# Add a <tt>TextView</tt> underneath the image which acts as a caption, saying "Rock" if the image is a rock, "Paper" if it's paper, and "Scissors" if it's scissors. The caption should be centered laterally. | # Add a <tt>TextView</tt> underneath the image which acts as a caption, saying "Rock" if the image is a rock, "Paper" if it's paper, and "Scissors" if it's scissors. The caption should be centered laterally. | ||
| − | # Finally, add a centered <tt>Button</tt> under the caption. This button should be labeled "New" and when pressed causes another random selection which (possibly) changes the image and caption above . The text should be set not through resources but instead by using <tt>setText()</tt> in <tt>MyActivity.java</tt>, and something similar should be done with the image. | + | # Finally, add a centered <tt>Button</tt> under the caption. This button should be labeled "New" and when pressed causes another random selection which (possibly) changes the image and caption above . The caption text should be set not through resources but instead by using <tt>setText()</tt> in <tt>MyActivity.java</tt>, and something similar should be done with the image. |
''Note'': Do NOT make changes to any other XML resource file besides <tt>activity_my.xml</tt>. | ''Note'': Do NOT make changes to any other XML resource file besides <tt>activity_my.xml</tt>. | ||
| − | Here is a screenshot of a sample program that satisfies the above requirements: | + | Here is a screenshot of a sample program that satisfies the above requirements (except it should say "MyLab_9"): |
| − | [[Image: | + | [[Image:300px-Lab10.png]]<br> |
===Submission=== | ===Submission=== | ||
Latest revision as of 08:57, 25 April 2017
Preliminaries
- Make a new Android project with n = 9 following these instructions through step 6. On step 7 "Select form factor...", switch over to step 4 on the Android developers page tutorial here and complete through step 6 which ends with "...click Finish". Make the activity be called "MyActivity".
Instructions
First, make the empty activity project as described above and confirm that you can build and run it -- either on the emulator or an actual Android device as explained on the next page "Run Your App".
Second, take the empty activity project and modify it to become a very simple "rock paper scissors" generator as detailed below:
- Change the layout in activity_my.xml to a vertical LinearLayout, similar to this example
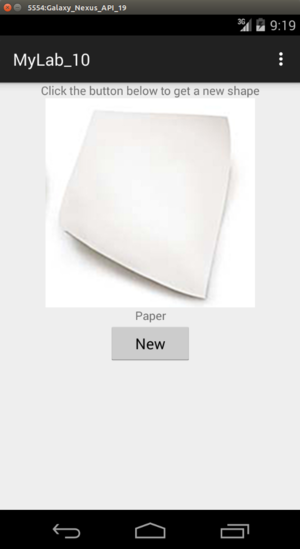
- Change the old TextView that was printing "Hello, world" to say "Click the button below to get a new shape".
- Add an ImageView underneath, centered laterally, that initially shows a rock, paper, OR scissors image. Find your own for these, cropped and scaled to 250 x 250, and put them in res/drawable with the names "rock.png", "paper.png", and "scissors.png". Here's some help for drawable resources
- Add a TextView underneath the image which acts as a caption, saying "Rock" if the image is a rock, "Paper" if it's paper, and "Scissors" if it's scissors. The caption should be centered laterally.
- Finally, add a centered Button under the caption. This button should be labeled "New" and when pressed causes another random selection which (possibly) changes the image and caption above . The caption text should be set not through resources but instead by using setText() in MyActivity.java, and something similar should be done with the image.
Note: Do NOT make changes to any other XML resource file besides activity_my.xml.
Here is a screenshot of a sample program that satisfies the above requirements (except it should say "MyLab_9"):
Submission
Submit your MyActivity.java and activity_my.xml. Make sure your name is in both. FYI, comments in XML files look like this:
<!-- here is my name -->
